Internal Competitions
Internal Competitions is a module in the NURamp application used for submission and review of internal grant competitions.
Introduction
For assistance outside the scope of this manual, contact the UNMC NURamp Support Team by email at nuramp-support@unmc.edu.
About Internal Competitions
Internal Competitions is a module in the NURamp application which can be accessed at nuramp.nebraska.edu.
It is used for submission and review of internal grant competitions, including pilot grants and University-wide grant initiatives.
Accessing Internal Competitions
Do not use Internet Explorer when accessing NURamp. Internet Explorer is not considered to be a "modern" browser, and won't work correctly with a number of web applications, including NURamp. Instead, use Mozilla Firefox, Microsoft Edge, or Google Chrome.
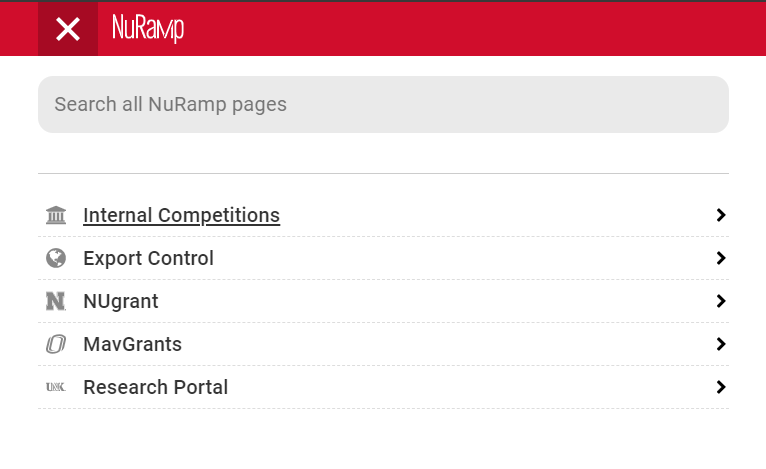
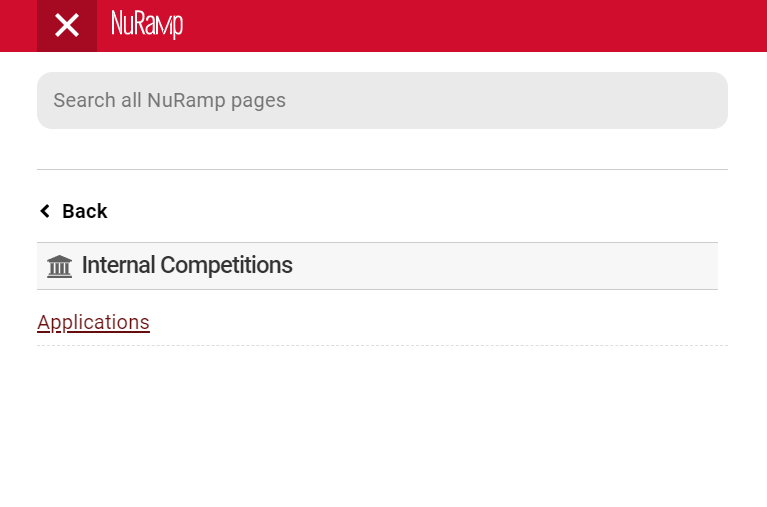
After logging in using your UNMC NetID and password, you can access the Internal Competitions module by clicking the menu icon in the top menu bar. Then, select "Internal Competitions", "Applications".
Accounts and Access
Alternate Approvers
About Alternate Approvers
NURamp allows users to delegate other users as their signatory in the form routing process. If you will need another person to electronically sign forms in NURamp on your behalf, add them as an alternate approver.
If you will need another person to create and submit from in NURamp on your behalf, see NURamp Assistants.
Add Approver
To add another user as an alternate approver, navigate to the Alternate Approvers preferences page and enter that user's information into the form.
A temporary alternate approver is time bound by the dates you specify, while a permanent alternate approver will remain valid until you revoke their permissions.

Step by Step
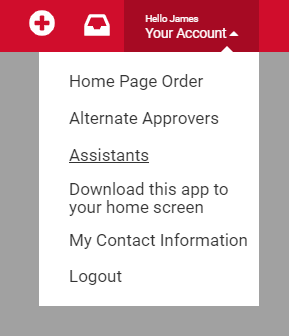
Click the "Your Account" dropdown and select "Alternate Approvers".

In the "Add Approver" form, enter the first few letters of the person's name who you want to add as an alternate approver.

NURamp will search all available users and will display users with their email address and phone number. Select the user from the dropdown menu to populate their information into the form.
You may add multiple alternate approvers at the same time.
Select the type of alternate approver that the user(s) entered into the form will be:
-
If the user will be a temporary alternate approver, also enter the dates their alternate approver status will be valid. Use the calendar inputs, or manually type in a date.
-
If the user will be a permanent alternate approver, you may leave the date fields blank.
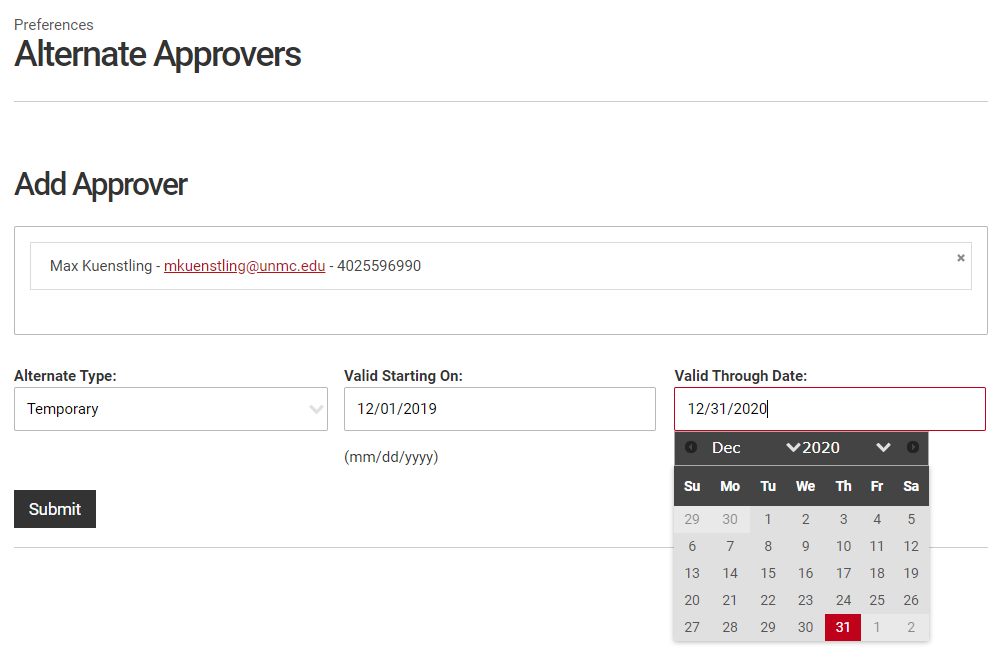
When finished, click "Submit".
You will receive a notification on the same page that your alternate approver was added successfully. If NURamp was unable to save your alternate approver, you will receive an error notification with additional details.

Remove Approver
To remove a user from their alternate approver role, navigate to the Alternate Approvers preferences page, select their name in the Existing Alternate Assignments table, and click "Delete Selected."

Step by Step
Click the "Your Account" dropdown and select "Alternate Approvers".
In the Existing Alternate Assignments table, select the user(s) you need to remove as alternate approver(s).
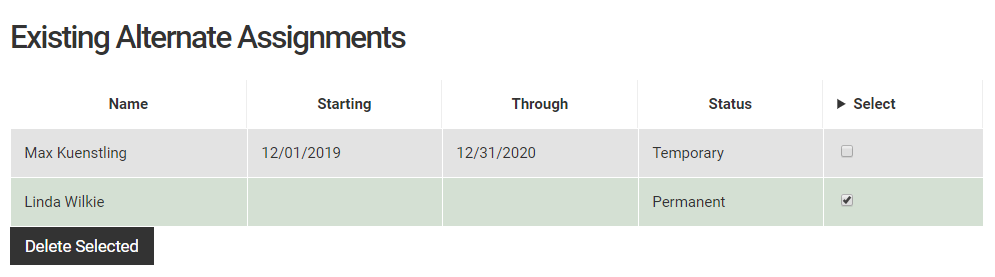
When finished, click "Delete Selected".
You will receive a notification on the same page that the selected user was successfully removed from your alternate approvers. If NURamp was unable to delete the selected alternate approver(s), you will receive an error notification with additional details.

NURamp Assistants
About NURamp Assistants
NURamp allows you to designate other users as "assistants" who will have access to your forms. Access can be granted on a per-module basis, or you can grant an assistant access to all modules.
NURamp Assistants have full access to the modules they are granted. Assistants are able to perform sensitive operations, including deleting forms and applications.
Add New Assistant
To add another user as an assistant, navigate to the Assistants preferences page and enter that user's information into the form.
Assistants will remain valid until you revoke their permissions.

Step by Step
Click the "Your Account" dropdown and select "Assistants."
Remove Assistant
To remove a user from their assistant role, navigate to the Assistants preferences page, select their name in the Current Assistants table, and click "Delete Selected."

Step by Step
Click the "Your Account" dropdown and select "Assistants."
Applications
Create New Application
Creating the application form
There are multiple ways to create a new Internal Competitions application form. This guide will outline the most descriptive method to follow and provide shortcuts below.

Step by Step
First, access the Internal Competitions module.
In the top left of the Applications page, click the "Add a New Application" button.

From the dropdown menu, select the program for which you would like to apply. Additional information about the program including the description, due date, sponsor, primary and secondary contact information, and attached files will be displayed.

To start the application, scroll down to the bottom of the information page and click the "Start Application" button.

A new application will be created.
Only click the "Start Application" button once. It may take a moment to generate the new application. While the system is working, do not click any applications buttons or reload the page.
Shortcuts
Menu Bar
In addition to the steps above, you may click the "add new item" button on the menu bar and select "Add New IC Application."


Quick Add
From the dashboard, you can also click the "Add New IC Application" from the "Quick Add Actions" widget.

Completing an Application
Introduction
To complete an application, principal investigators, their collaborators, and assistants may enter the project details into the form fields. This includes the project details, budget, and goals.
Each page of the application form has a progress indicator that indicates the form's status in the workflow. As sections of the application are completed, the sidebar will update with a check box.
It is helpful to note your application ID number To quickly return to an application you've started, simply search using the application ID number from the Application screen search field

Project Details
Application Summary
Details about the application, including the unique ID, name of the competition and due date are available on the initial page.

Form Preparation
Enter the title of the project, the type of grant being requested, and whether a Reviewer Non-Disclosure Agreement is required. Depending on the competition there may be fewer or additional fields. Starred fields are required.

Principal Investigator
Each application may only have one principal investigator (PI). Enter a few letters of their first or last name into the search field and click the correct person from the results to populate their information.

Repeat the same steps for the PI's college and department, keeping in mind there may be multiple options across campuses.


Before moving on, double-check that the correct college, department, and campus have been selected for the PI. These selections will determine how the form is routed for signatures later in the process; they must be correct for the application to be considered.

Co-Investigators
If the application will have co-investigators, click the "Add New Co-Investigators" button to populate them.

This will open a modal window to add each co-investigator. The co-investigator form works identical to the PI lookup form.

Before moving on, check to make sure the information is correct for each co-investigator. To view or edit a co-investigator, click the pencil icon ( ) next to their name. To remove a co-investigator, click the "X" icon (
 ) next to their name.

Abstract and Narrative
Some competitions have a separate field for Abstracts. You may paste your text, but not images into this field. Other competitions require the Abstract and Narrative to be uploaded as a single file. Read your competition guidelines carefully to determine how to structure your proposal.
Budget
Budgets vary from competition to competition. Some will ask for budget details to be filled out in a separate budget step, some have only a field or two to fill out, others ask for a budget to be uploaded as a separate file.
Simple budgets will ask for dollar amounts to be entered into defined fields. These budgets often include a self-totaling field. Do not attempt to adjust this field, if the total is not what you intended adjust the contributing fields.
Complex budgets can involve multiple categories and sub-award information. Starred fields are required and you may need to enter a zero if there are no budget requirements for that category.
Look for a file upload button near the bottom of a budget page if budget spreadsheets or justifications are required.
Read the competition guidelines to be certain that you do not include items which are not allowed and that the budget includes all necessary information.
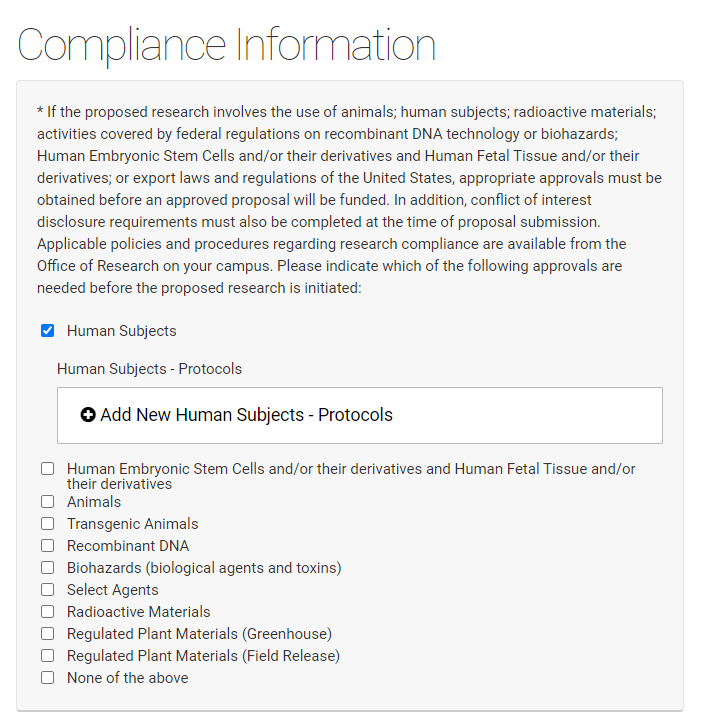
Compliance Information
If a competition includes a section for compliance, this is required information even if you have been asked to supply it separately on the UNMC face sheet. You will be asked to add protocol numbers and status by clicking on the "Add protocols" field that appears when you've checked a regulated area.
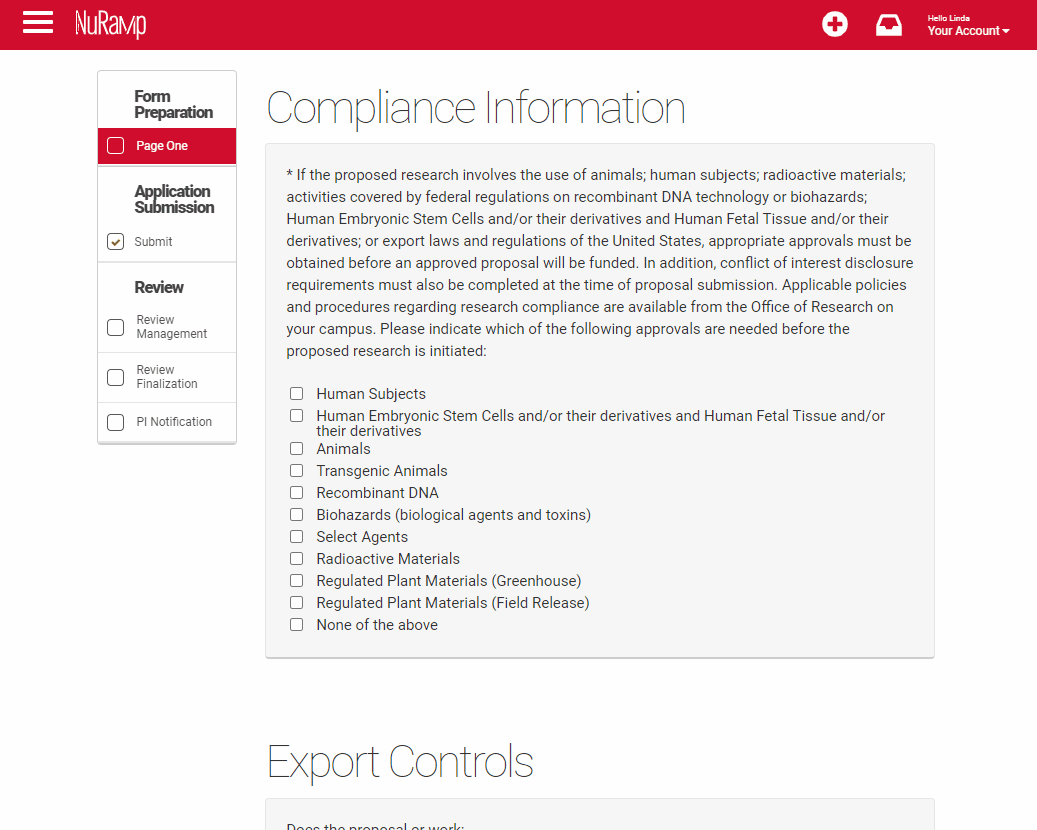
Step by Step
Select all the compliance areas that apply to your proposal. If there are no regulated areas in your proposal select "None of the above".
If you have selected a regulated area a second screen will open to allow you to add details, these are required fields.
Select your campus and the status of the regulated protocol.
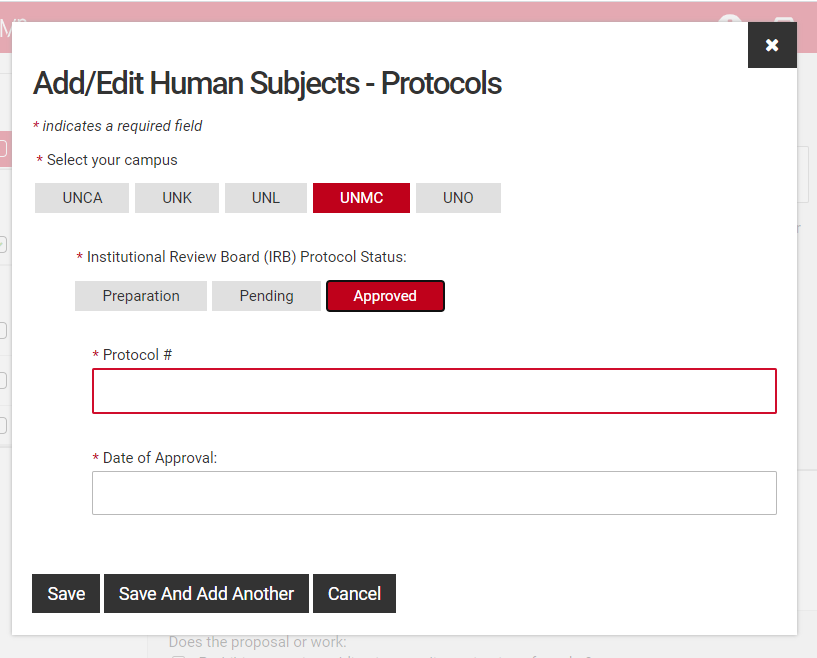
Fill in the protocol number and date for approved protocols, pending protocols will require just the protocol number. Those in preparation will not require either, however a JIT approval may be required if your proposal is selected. You may either type the date or use the pop-up calendar to select your dates.
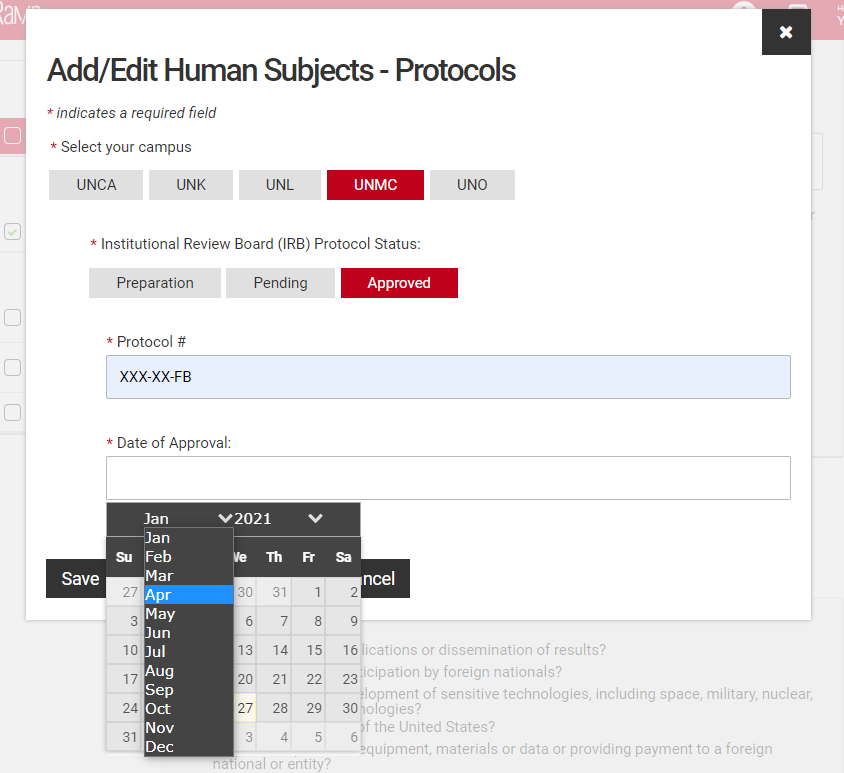
Click "Save" to complete this step or "Save and Add Another" if additional protocols are relevant.
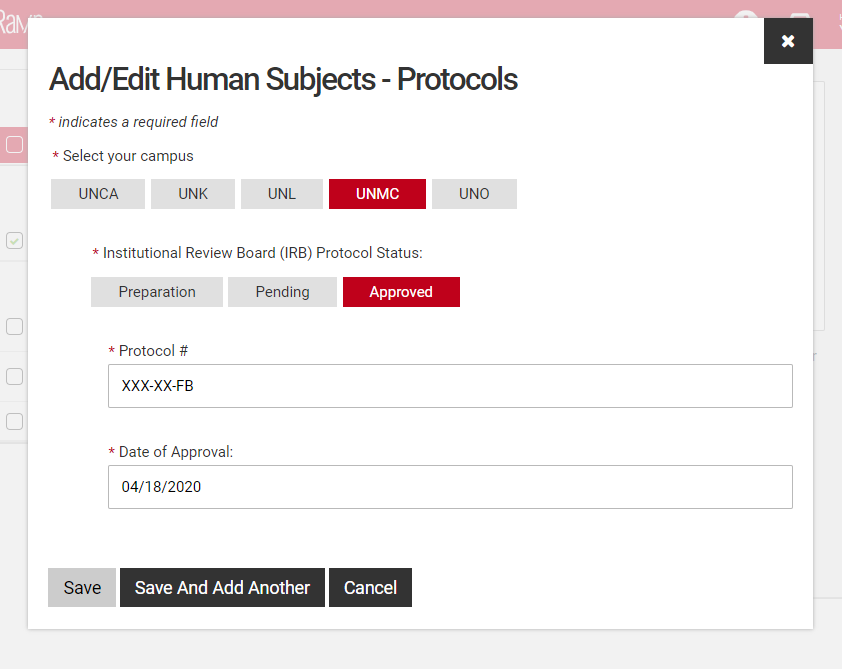
The completed information will display below the compliance field with buttons to allow you to correct information or remove it.

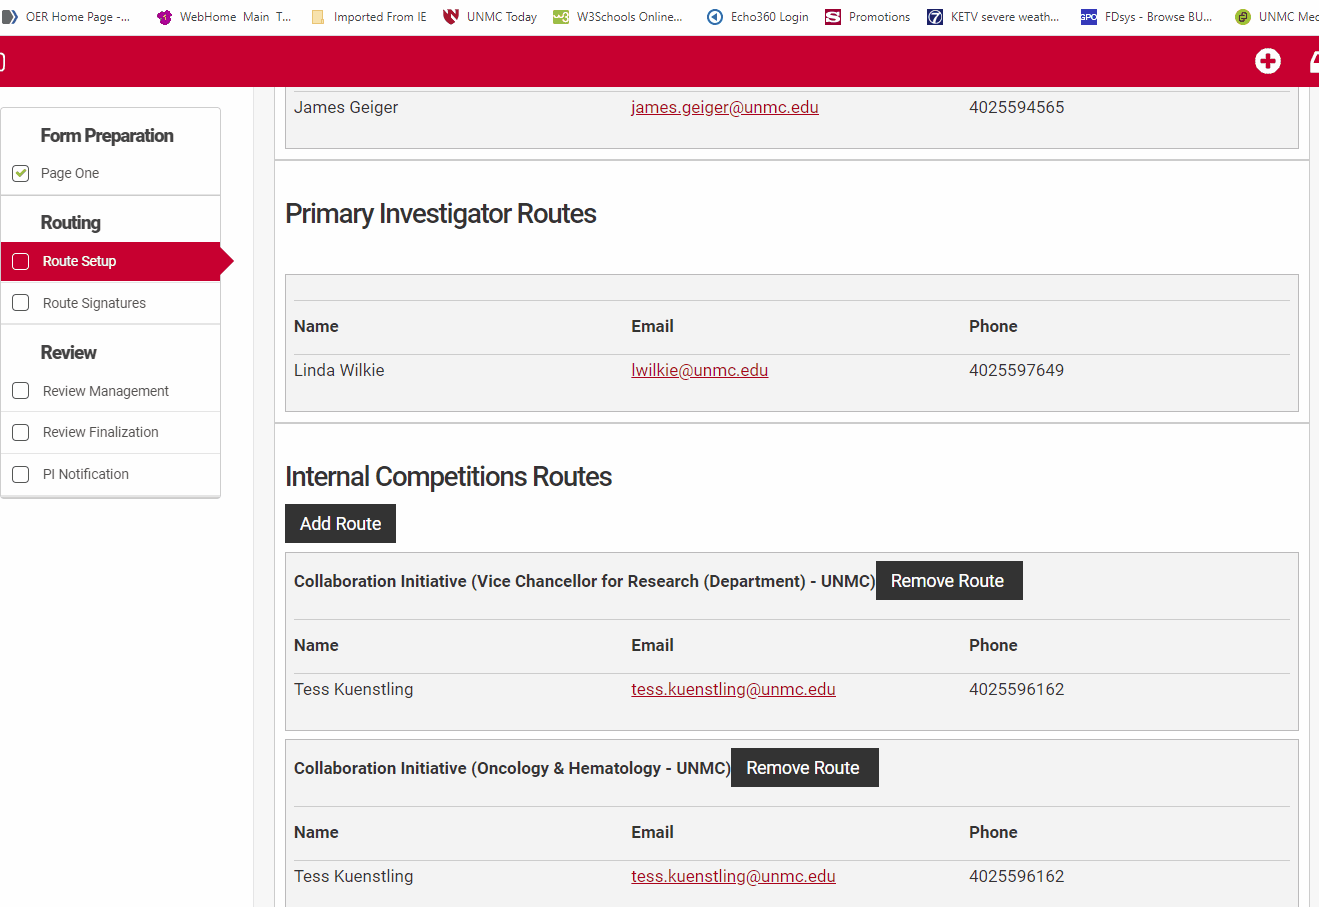
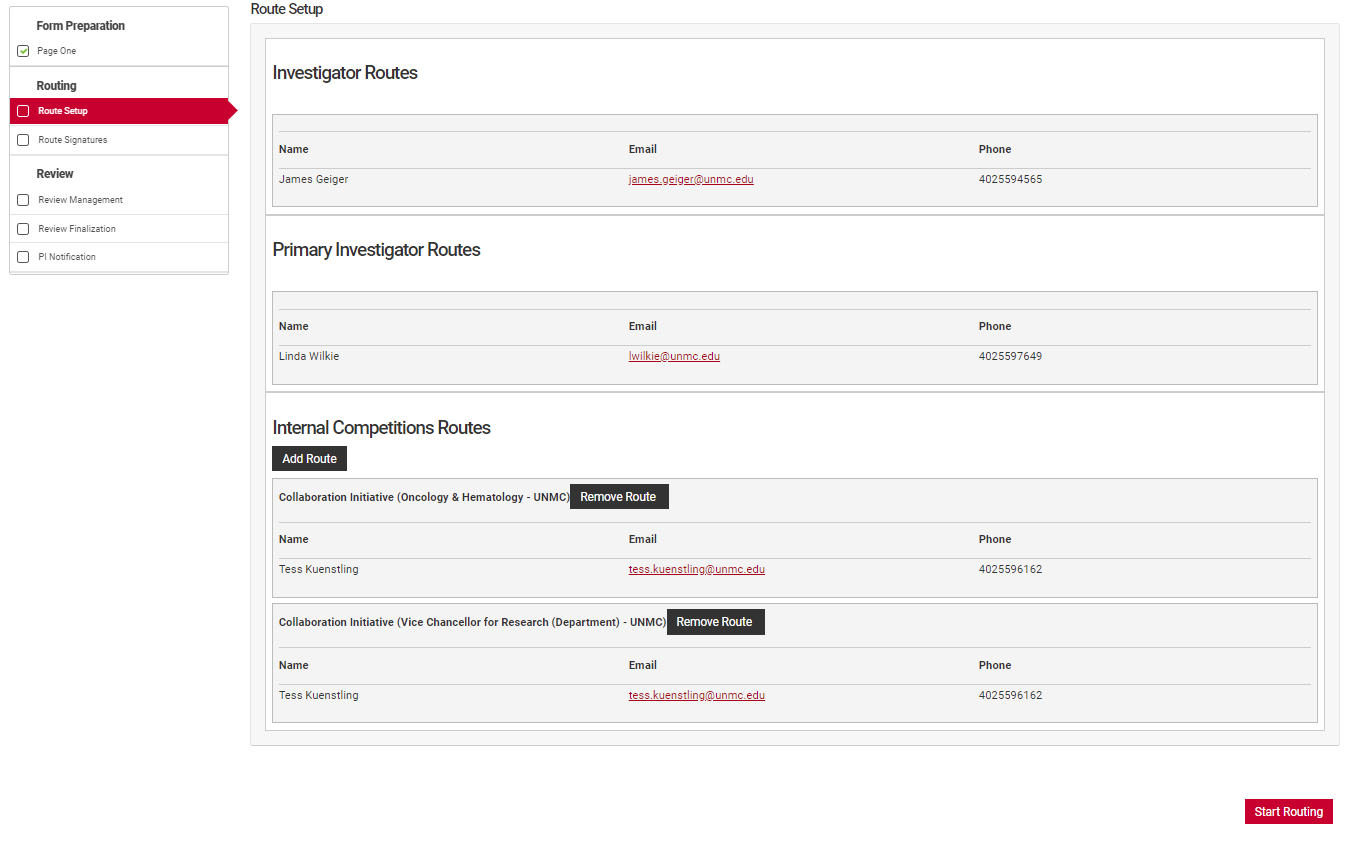
Route Setup
Most competitions in NuRamp utilize routing to gather approval signatures. These routes are defined by the competition managers and are always tied to the departmental affiliation of the PI's and Co-I's named in the application. UNMC managed internal competitions will always include which route a submitter should select in the competition guidelines.
The Prinicipal Investigator or their assistant must review the route setup from the routing menu for accuracy. Check that all co-Investigators named in "Form Preparation" are listed in the Investigator routes section and that the Principal Investigator is listed under the Primary Investigator Routes section. Check that the correct institutional email is associated with their name.
Children's Hospital affiliated investigators should use their UNMC email addresses for all applications submitted through NuRamp.
Review the Internal Competitions Routes for accuracy. Check that the correct route for each person is named in the routes section. UNMC uses two named routes, "Default" and "Collaboration Initiative". The "Default" route will have a departmental and unit signature path similar to the routing used in ADIS internal forms, while the "Collaboration Initiative" route requires an Office of the Vice Chancellor for Research single signature.
If a route is incorrect, use the "Remove Route" button to remove it. Then use the "Add Route" button to add the correct route. If the correct route is not visible for the investigator in question, contact the competition manager for assistance.
Step by Step
If a route is incorrect for any investigator on the Internal Competitons Routes section you will need to remove it and add the correct route.
Remove the route at the departmental level using the "Remove Route" button. This will open a new dialog box.
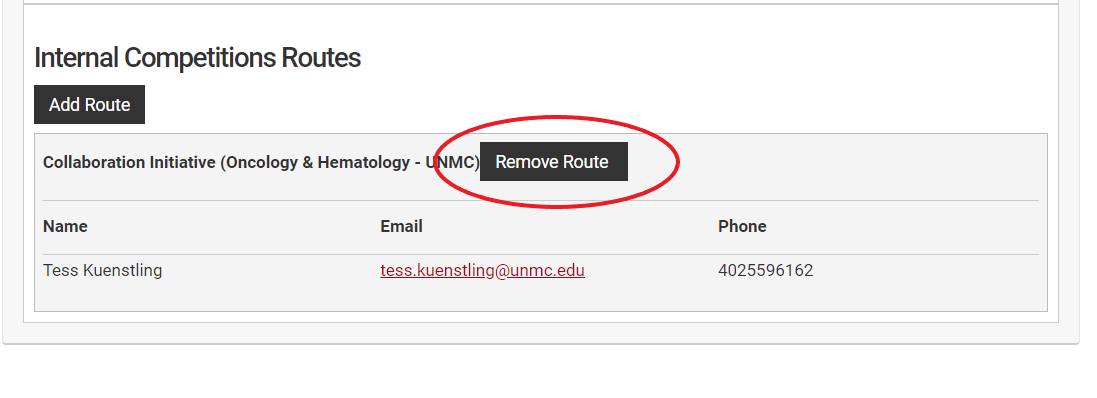
Select the correct route from the dialog box and select "Add Route" to add it to the routes.

If the correct route is not a choice, contact the competition manager for assistance.
Check that the Internal Competitions Routes for all investigators are correct before submitting to routing.
If all the routes are correct. Submit to routing by clicking the "Start Routing" button at the bottom of the screen.
Route Signatures
Route signatures is the final step in submitting an application in the NuRamp system. All of the applicants and all of the signatory authorities detailed in the routing setup must sign off on the application in order for the application to be eligible for consideration.
The principal investigator must sign off first in order for the signature requests notices to be sent to the other investigators and ultimately to the remaining signers. The proposal will stay in "Submitted to Routing" status until all participants and route signatories have completed their selection. If the routing deadline passes without all signatures the proposal will be considered incomplete and will be removed from further consideration for award.
Once routing has been triggered by the Principal Investigator's approval, the co-Investigators will receive an automated email request to login to NuRamp and sign-off on the application. If you are already logged into the NuRamp application, clicking on this email message and corresponding link will take you directly to the Route Signature page. If you are not logged in, make note of the application number so that you locate it amoung the other applications.
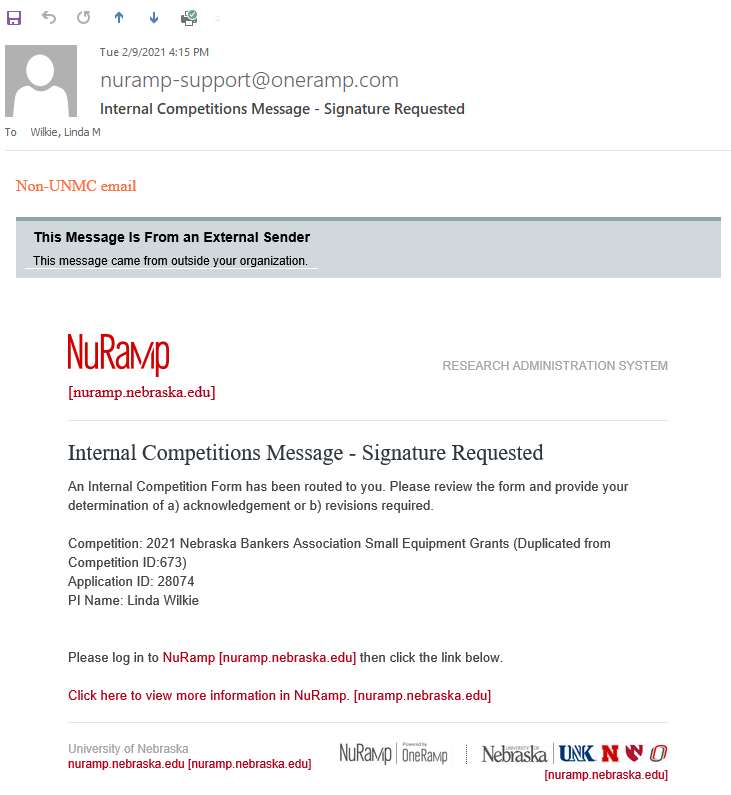
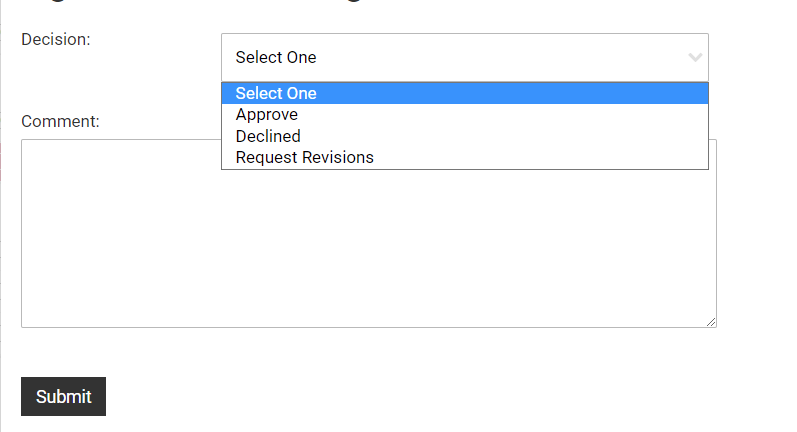
To accept the proposal as submitted. click the "Sign Off" button next to your name in the "Confirmation of Signatures" section. This will open a dialog box where you may designate your decision to Approve, Decline, or Request Revisions.
A declination will halt the application and no further signatures or approvals can be accepted. If you have concerns select "Send back for revisions" and note those in the comments section so the Principal Investigator can address them.
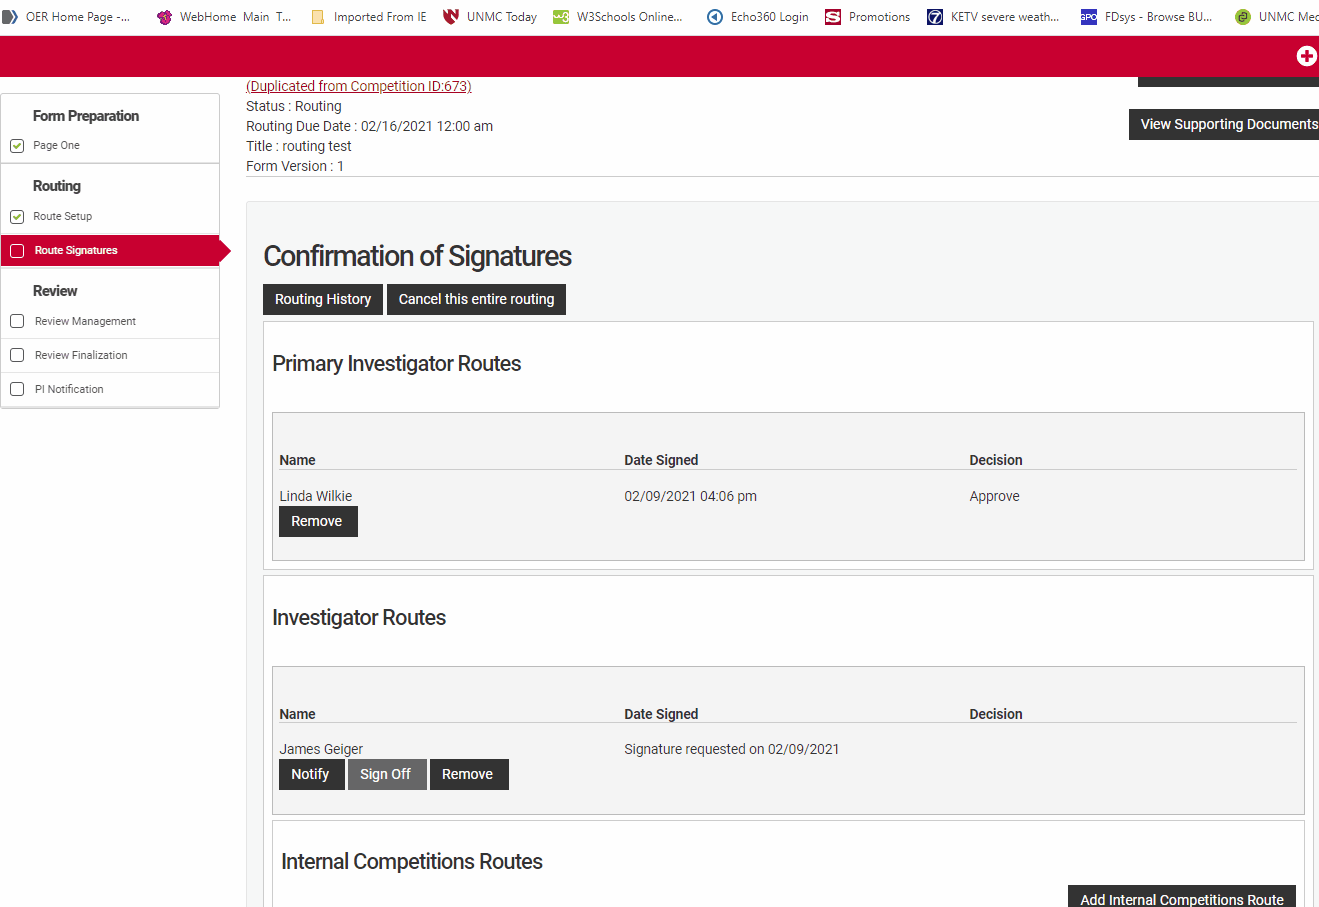
Step by Step
To respond to a request for signature in NuRamp navigate to the Route Signatures page and locate your name. Click the "Sign Off" button to open a signature dialog box.

Select Approve, Decline, Request Revisions from the drop-down field. Add comments if you are sending back for revision or declining to approve the application.
If you are a co-Investigator for the proposal your signature will trigger an alert to the person who signs off on your route that they need to login and approve the proposal.
Once all investigators and the route signatories have added their decisions to the application, the proposals status will change to "Submitted to Review" and the investigators' responsiblities are completed. The proposal has successfully been submitted.
Manage Existing Application
Attach Files
Most NuRamp applications will require additional information to be added to a proposal or review in the form of an attachment.
NuRamp accepts files with the following formats: .docx, .doc, .csv, .xls, .xlsx, .jpg, .png, or .pdf.
File Upload
Files should be attached using the File Upload sections in the Form Preparation step of the application. Depending on the competition there may be more than one place that requires files to be uploaded. Notably, budget justifications are often required to be uploaded in the budget section rather than with other documents.
Always read your competition instructions to determine if proposal materials should be uploaded as a single document or if multiple attachments are required.
Typical types of attachments are lay abstracts, proposal narratives, budget justifications, biosketches, and PHS Inclusion Enrollment reports. If a competition requires multiple attachments it is best to name each uniquely with the application ID#, PI name, and type of document, i.e. 27699-Wilkie-LayAbstract.
File Attachment Menu
The File Attachment menu in the Application Summary allows you to easily navigate to where your file attachments are found. As files are attached to your application they will be cached here.
Generate Form PDF
Delete an Application
Reviewing Applications
Accessing Reviews
From time to time, you may be asked to serve on a review committee for an internal competition.
When the application is ready for review in the NURamp system, you will receive an email indicating that applications are ready for your review.
Log in to the NURamp system to access the applications. In the top-right of the screen by your account name, your system inbox will have a blue mark indicating that you have new items.

Click the file tray icon to go to your system inbox.

A list of the applications you've been asked to review will be displayed. Click on the description to open the review form for that application.
Completing a Review
Complete Review Assessment
After accessing a review request from your system inbox, the review management page will display for the application you've selected.
Read the instructions provided in the gray text box for specific review requirements for the competition.
To view the application form, click the "View Application PDF" button.
The applicants may have also uploaded supplimental documentation including narratives, biosketches, and CVs. You may download these by clicking the "View Supporting Documents" button.

In the "Review Assessment" section, complete the review questions. The assessment will vary from competition-to-competition, and some may provide a file upload to attach other review documentation.

When you have completed the review, click the checkbox at the bottom of the page, "Check if this page is complete". Then, click the "Save Form" button.

A notification will indicate that your review has been saved, but not yet submitted. Click the "Submit Review" link to go to the next section.

Submit Review
Although you may have saved your review form and uploaded any supplemental review documentation, you must submit your final recommendations for the application.
Indicate your review recommendation in the dropdown, provide any additional comments, and click the "Submit Recommendation" button.

A notification will indicate that your review has been submitted.
To submit a review for another application, return to your system inbox to complete the process for each application you've been asked to review.

Confirm Submission
You may confirm your review submission in the review summary section of the review page. Your name will be listed next to the recommendation you entered in the "Submit Review" section.
